My shopping cart
Your cart is currently empty.
Continue Shopping
Several years ago, when I had a repairman out to work on my washer, he casually asked when the last time was that I had my dryer vent cleaned. I explained I cleaned the lint trap after every load, but that wasn’t what he meant. He was asking about the entire dryer duct run.
I admitted I never had. He immediately called his buddy who specialized in dryer vent cleaning. I watched, horrified, as a massive blizzard of lint buildup spilled out from my 20+ ft. of dryer vent ducting.
I was so glad I had it done.
According to the U.S. Fire Administration:
Although the data is based on a 2008 to 2010 study, there’s no reason to assume the numbers have improved.
Recently, I had the dryer vent system cleaned again. How did I know it was time? There are several warning signs:
In my case:

Note the lint buildup around the housing as well as under the flapper. The bird guard was removed in anticipation of the cleaning process.
So, have your dryer ducts been cleaned out? If your answer is “Never” or “I don’t know,” or it’s been longer than a year, it’s time.
Whether you invest in a dryer vent cleaning kit to do it yourself or hire a handyman, the basic steps are the same, although the order might be different. Be sure to allow several hours. This is not a 10-minute job!
Before you start the cleaning process, be sure to unplug the dryer and carefully pull it away from the wall. This allows easy access to the back of the dryer. If it is a gas dryer, turn off the gas feed and make sure you don’t stretch things so far as to accidentally disconnect the gas hose. You can leave the ducting in place for now. Sweep up any loose lint and retrieve anything else that might have fallen back behind the dryer.
Remove and clean the dryer lint trap. Then, use your vacuum with the narrow crevice tool or a long bristly brush to clean the cavity in which it sits. Carefully dig deep and keep cleaning till you can’t pull out any more lint.

Clean the lint trap after every dryer load. When cleaning the whole duct system, remove so you can access the cavity underneath it.
If you use dryer sheets, you’ll need to carefully wash the lint trap in warm soapy water to remove the waxy residue that can clog it. Rinse and thoroughly dry with a towel. If it’s damaged, order a new one right away.
Lint is not well behaved. It goes EVERYWHERE. That’s why just cleaning the lint trap is not enough. Lint can get into the dryer’s inner workings and leak out the back as well as build up in the ductwork.

Remove the housing and duct to vacuum the interior
So don’t be surprised if your handyman removes the dryer’s metal housing as well as whatever kind of duct is hooked to the back of the dryer. It’s the only way to thoroughly vacuum inside. This deeper-clean step can be done now or as a wrap-up after the main ductwork has been cleaned.
Some exhaust runs are quite short while others, like mine, are long. Regardless, you need to use a specialty dryer vent cleaning kit. A kit consists of one or more flexible fiberglass shafts and a brush head. Each shaft is generally 12 in. long. So, if your kit doesn’t have enough, you can usually buy an extension kit. Some kits are designed to work with power drills, ideal for long runs. Others can be used manually.

Here’s the kit my vent-cleaning handyman uses with his drill. The long brush is ideal for cleaning a dryer’s lint trap cavity. The round brush is for use inside the ductwork.
For long runs, my vent-cleaning handyman uses a dry vac/blower in addition to the drill-powered lint cleaning kit. That way he can force air through the dryer vent run and out through the exhaust vent flapper—or suck it all back into its holding tank. So, he uses a special vacuum adapter insert that fits inside the 4 in. diameter ducting.

Vacuum adapter insert with 2 holes—one for the vacuum and the other for the flex rods
It has a small hole through which to feed the rods. The larger one couples to the vacuum’s hose. This allows him to easily maintain a strong positive or negative flow of air as he adds each extension rod to work his way through the dryer vent exhaust system. You can find vent cleaning kits that include a vacuum adapter.
If you have a fairly short run, you may want to start from the outside and work your way in. Or you may want to start from each side and meet in the middle. With my exhaust located up high, the only practical option is to start from the inside.
To begin, he uses the blower function of the dry vac along with the kit’s duct brush to push the lint up and out. He adds rod after rod to move the brush head upward through the duct run.
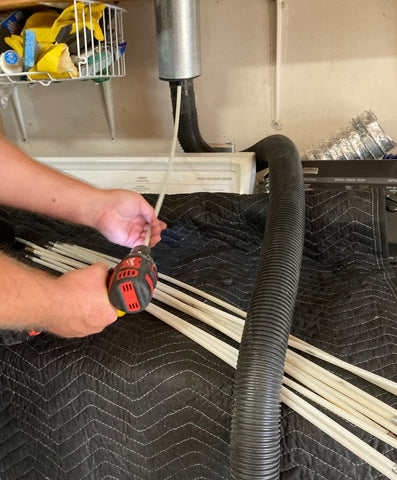
It was easy for him to access the main run of rigid metal pipe. Aluminum flex runs from the pipe down behind the dryer to its exhaust outlet.
Others may prefer to let gravity do the work to pull everything back down. Either way, the loosened lint should be captured so it can be bagged and thrown away.

That’s a lot of lint! With the addition of each extension rod, more kept coming. Put a tarp or plastic sheet on the ground to catch it all.
Once the cleaning brush reaches the outer vent cap, he changes to vacuum mode. As he carefully works the brush and rods back down the ductwork, the reverse airflow suctions even more lint into the vac’s holding tank.
My handyman saves the aluminum flex that attaches to the dryer for last.

But you may want to tackle that first. It’s your choice.
To finish up, he reattaches the aluminum foil flex to the pipe, using the clamp and appropriate tape to ensure a tight seal.

He then plugs the dryer back in and lets it run for a while to push out any last bits of lint.
Finally, the big reveal. Just how much lint is in the shop vac?

I was impressed!
It’s obvious that I need to do this every year. For those of you who do laundry multiple times a week or have fur babies, consider cleaning the dryer ducts several times a year.
One thing I noticed during the cleaning process was that my aluminum foil flex, installed some 20+ years ago, is becoming brittle. So, I need to explore other options. Should I simply replace the flex? Add an all-metal angled elbow at the dryer exhaust and then attach something flexible to it so it joins up with the pipe?
Let’s look at the 5 kinds of dryer ducts commonly found in homes. Just because they are used, though, doesn’t mean they meet code! Plus, what meets code varies around the country.

Rigid metal pipe is the most recommended kind. It can be aluminum or galvanized steel. It’s typically used for duct runs in floors, walls, attics, or anywhere that’s hidden from view. Rigid metal pipe should never be bent. This means any angles or curves must be negotiated with some other kind of connector like rigid metal elbows or other kinds of tubing. Of all the kinds of tubing, rigid is the most long-lasting and the only one that can be concealed. Plus, it is completely smooth inside for maximum airflow and minimal lint catching.
Aluminum foil duct is very flexible, making it easy to install. The ribbed walls and accordion-like properties also make it easy to adjust length—or you can cut to fit. However, its ribs can trap lint. It should not be used for the entire duct run and never in concealed areas.
One type that is quite popular and what we sell at Certified Appliance Accessories is the aluminum semi rigid dryer duct. Like the flexible foil, it is easy to work with and accordions. But it is much stronger and more rigid. You can’t make radical bends with it, but it will curve. If you cut it to fit exactly by stretching it out and eliminating the excess, it will be less likely to catch lint. It too should not be used in concealed areas.
Solid metal slim ducts with their flatter, rectangular shape are ideal when the space between the dryer and the wall is tight. Periscope slim ducts telescope in length to fit installation needs with one end connecting to the dryer and the other connecting to the vent pipe. Non-telescoping versions are available as well as ones with rotating connectors.
Plastic or vinyl tubing is very cheap and flexible. That’s why it’s used a lot. However, it is against code to use it with dryers because it cannot withstand the high temperatures. If you have this as a part of your dryer vent system, replace it immediately. It’s a fire danger.
Finally, if for some reason your dryer does not vent directly outside but rather into the attic, a fireplace, or any concealed space, with rare exception that’s against code and a fire hazard. Talk to your handyman or contractor on how to reroute the venting.
When looking for a clothes dryer transition duct—that’s a connector that allows you to transition from the dryer outlet to the rest of the dryer vent system—the key term to look for is UL 2158A. Anything with that UL specification can handle a dryer’s super-hot exhaust plus has certain fire-resistance specs.
Other terms include Class 1 which is for flexible aluminum foil and Class 0 for semi rigid. Certified Appliance Accessories’ semi rigid dryer vents are UL 2158A, Class 0.
Aluminum or galvanized steel elbows are also a good option, with Class 0 or Class 1 ducting to connect the elbow to the main vent pipe. So are periscope ducts or those with adjustable angles.
However, just because something is UL 2158A doesn’t mean your local building codes will allow it. Some prohibit any kind of flexible vent tubing. So, check with your handyman or other knowledgeable source such as a local building inspector. Check your dryer’s manual too. It may specify what should be used.
Ideally, you should look over what you can see of your dryer vent system BEFORE you clean it out. If something is damaged, buy a replacement and install it after the cleaning process, while it’s still easy to access everything. But if you spot issues during duct cleaning like I did, that’s okay. Take note of what you need and put it on the top of your to-do list.
If you’re ready to buy semi rigid dryer ducting, be sure to check out what Certified Appliance Accessories offers. We have ducts with and without elbows and they’ll work with either gas or electric dryers.
And if you’re installing a new dryer, we also have dryer duct kits that include 3-wire or 4-wire 30-amp electrical cords. That’s because you shouldn’t reuse old electrical cords, and odds are your new dryer won’t come with one. We also sell dryer cords as standalone items.
Finally, if you need to buy a new dryer and would like some guidance, be sure to check out our blog “The Rough and Tumble World of the Clothes Dryer." It will tell you what you need to know to be a savvy dryer shopper.
Disclaimer: This article is for informational and educational purposes only. Certified Appliance Accessories is not liable or responsible for any damages resulting from or related to your use of this information.